How To Set Up Your Inventory Clothes Closet
To put it plainly, there is a right way to set up your avatar and clothing in your inventory and there is a wrong way. The wrong way will create a situation where you are definitely going to waste a lot of time trying to put clothes on and then take them off while the right way is so simple that changing outfits on your avi takes only seconds.
The Wrong Way: Arrrgggghhhhhhh!!! Frustration!!!!! Who the hell designed this stupid outfit anyhow????
The Right Way
There are three files in your inventory that you will be using to organize your clothes closet: 1) Body Parts, 2) Clothing, and 3) Outfits. Each one has a purpose and, when used correctly, will make applying outfits and changing into them a very easy part of your virtual world experience.
Body Parts
Once you have decided upon an avatar skin and shape, be sure to place those items in this file. Include any other body parts such as eyes and, of course, what we call "private parts" while understanding that everyone knows what that means. Smiling? Also, be sure to avoid placing or separating these basic avatar items in sub files in the Body Parts file. Simply place each part in the file as is. It is from this file that the system is set up to find your avatar body parts as it was designed to do.
Note; Some prefer to also place their hairstyles here but I would recommend that you not do that if you have more than one hairstyle that you like to wear.
P.S. I would post a graphic of my own Body Parts inventory but, well, you know....It is private. LOL
|
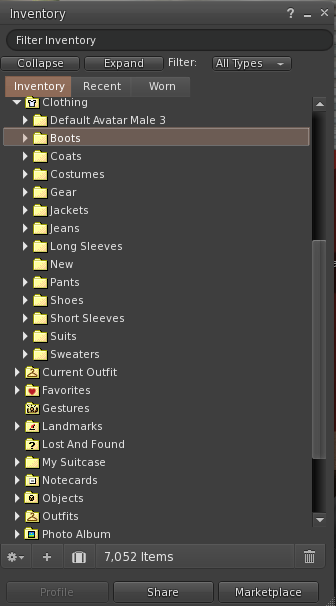
Clothing
This is where you will place all of the files you collect that actually have the clothing items. 1. Create sub-files that divide the types of clothing that you want in your inventory closet (see example graphic to the right). 2. You can also create further sub-files in those files if you want to divide up your clothing by color or style or whatever would help you to avoid having fifty jumbled up files under, let's say, your "Jackets" file. 3. Change the names of the files that you collect to a description rather than using the designers name (most names don't describe the outfit). For example, change "Monique Glamour" to "Black Short Cocktail Dress". This will make it so much easier for you to find outfits in your Inventory Clothing file should you need to do so. Yes, this takes time to set up but you will be so happy with the result being the ease in which you are able to change your avatar's clothes. |
|
|
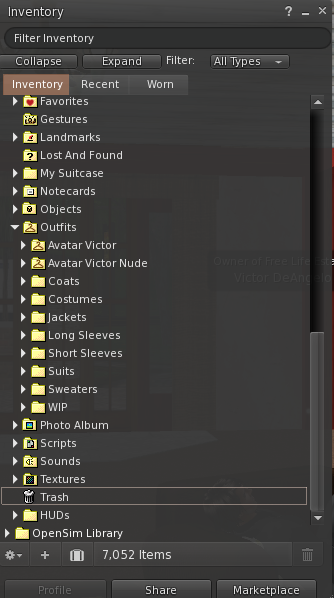
Outfits
This is where you save the outfits that you have placed on your avatar so that you can easily rez them on to your avatar without having to go through the whole process of removing clothing and then applying other clothing. 1. Create sub-files that match those that have complete outfits in them up in your Clothing file. In this way, you can find the clothing files immediately because you have set up your Outfits files to match your Clothing files. 2. Very Important: Before you frustrate yourself to death putting on and taking clothes off of your avatars, create a totally naked avatar first and then save it to your Outfits folder naming it using the word "Avatar" as a prefix (see graphic example to the right). You will then be able to rez this avatar each time you want to apply a new outfit and then save the outfit. This avatar is going to be the template you will use to create your saved outfits and naming it as you did will place it at the top of your Outfits file list to find it so much more easily. |
|
Note: As you can see by looking at the graphic I have provided to the right, I created a naked avatar without my "private parts" and one with them. This gives me more flexibility when I want to apply clothing
3. Name each outfit that you save to match the Clothing file. For example, you saved the Clothing file you named "Black Short Cocktail Dress" so, when you save the same outfit on your avatar, name it the exact same thing. In this way, you will be able to find the clothing file immediately if you need to do so.
4. You can also create sub-files within your sub-files to divide up your clothing by color or style or whatever would help you to avoid having jumbled up files as was stated above.
5. An additional tip is to create a WIP (Works In Progress) file in your Inventory Outfits for those outfits you have applied to your naked avatar but perhaps did not have the correct shoes or some other item to correctly complete the outfit. You might name such an outfit as "Black Short Cocktail Dress...Needs Black Shoes." This will save you a lot of time as well as help you to avoid forgetting about outfits that you want to use.
Note: You will find that simply grabbing each item in an outfit and sliding it over to your avatar is much quicker than clicking each part to apply. Give it a try and, if not comfortable for you, then return to clicking. It is just another way to do it.
All you have to do now is drag the outfits you have saved by name over to your avatar and it will immediately rez with the outfit on and looking good. No more taking off clothes and putting on clothes for each change! Yayyyy!!!
